Monday, February 27, 2012

Sew Sew

Guess what I got for Valentine's Day....a new sewing machine!  Thanks to my sweet hubby!  My mom's old machine has served me well for the last few years and I am grateful for getting to use it. I may have finally pushed ol' bessy to her limit though. So, time for a new one. I LOVE my new machine. I am already spoiled with it.  Here is my new beauty:


I have already broken it in a bit by completing a few items on my "need to sew" project list (the list is a long one!). I finally got around to sewing little pillows for both of the boys. I made Carter a pillow a couple years ago that he takes with him everywhere and sleeps with every night...it is his "comfort thing". I made it with polyfill though and it is just not holding up very well. So, time to make a new and improved pillow. As I suspected though, he wants nothing to do with his new pillow, he just wants what we now call "old pillow" (I would like to call it "old, disgusting, used to be but is no longer white, pillow"). I am hoping "new pillow" will grow on him. This is Carter's new pillow:


I also made one for Cole. He likes to play with Carter's pillow whenever he can which does not go over well with big brother..."NNNOOO baby Cole!"....so I decided he needed one of his own. It is still much more fun, however, to take brother's than play with his own:). Here is Cole's pillow:


So two new pillows, neither of which get used! Oh well, at least they are cute "accents":). They are very comfortable pillows if I may say so myself. I used an old down pillow to make them. I cut the old down pillow in two and sewed each end shut (it looked like it was snowing outside when I cut it because of all of the small feathers blowing around). Then I made a pillow case for each and I was done.

My latest project was a ruffled scarf for my mother-in-law. I have made several ruffled scarves before but I experimented with a new technique this time. In the past, I have used elastic thread to create the ruffles. This time I did a loose stitch down the middle, pulled the thread through to make my own ruffles and then stitched them in place. I am not sure which method I like better yet. Here is how the scarf turned out:


Now to complete the other 739 sewing projects...some day:)! Maybe on the next project I will be on the ball enough to actually take step-by-step pictures.

Carter's Room

Well, I have given you a taste of my style with different (random) parts of my home...I thought it was about time to show you a bedroom. I will start with my favorite bedroom in the house, Carter's room.  When we first moved in, I was pregnant with Carter so we prepared one room as the nursery and the other room we just set up as a guest room. So when Carter was born, he moved straight into the nursery (he seriously only slept in our room for like 3 days...which was still 3 days more than Cole did:)) and that was his room up until about 4-5 months before we had Cole. When Caleb and I knew we were having another baby, we thought it would be a lot easier for the nursery to stay the nursery (it is gender neutral) and make the guest room Carter's big boy room.

Since we didn't want Carter to feel like he was getting kicked out of his room, we made a really big deal out of his new room and kept him very involved in the process of transforming the room. We also made sure to make the move to the new room long before little brother was born so there would not be too much change at one time. Praise the Lord, the switch went wonderfully and Carter has loved his new room from day 1!

Here is what Carter's room looked like before we moved in (previous owner's furniture etc.):


Pretty drab right? Wish I had gotten more pictures but you can see there was nothing special about this room.

Here are some progress pictures from when we were installing the board and batten on the walls:


Here is Carter's room now (be prepared for LOTS of pictures)...the color is the same as the progress pictures but it looks different in these pictures...


What do you think? It is always a challenge making kids' rooms cute and not too cluttered with toys! We have most of his big toys in the closet and the small ones are in the various baskets you see around the room. I also tried not to make his room too " themey" with airplanes galore because I didn't want him (or me) to get tired of it or feel like he would outgrow it too fast. So, I tried to keep a balance with just airplane accents (hanging airplane, framed airplanes pics, propeller on the shelf, flight instructing sign, instruments on his nightstand and dresser etc.). It still looks like a colorful, fun kid's room...just not over the top. At least that's my opinion:). Hope you enjoyed Carter's room!

Friday, February 17, 2012

Master Bathroom

Wow, could it be that I am posting two days in a row!?!  You are impressed, aren't you.  Don't get too used to it though:).  I wanted to take a little break from the downstairs and show you an upstairs room.  I have to switch things up just to make it more interesting (at least for me).  This evening I am going to show you before and after pictures of our master bathroom.  Let me just tell you, when we moved in, there was nothing special about this bathroom at all.  It probably looked exactly like all the other bathrooms in the other houses in our neighborhood.  It even had carpet throughout the ENTIRE room. GROSS.  How can that possibly be sanitary?  GROSS. Sorry, I said that already.  Anyway, I loved that our bathroom was nice and spacious, but I wanted to take the "standard" look and replace it with a "custom" look...cheap custom that doesn't look cheap...you know? I must say "you know" a lot because after almost everything Carter tells me, he says "you know, Mommy?" Okay, off topic, sorry.  Here is what the bathroom used to look like:


Yep, feel free to comment on the cute pregnant girl in the reflection of the mirror!  Ha! Actually, the first pic is my mom and she is cute!  As for me, not my finest moment:). I have since learned to angle myself out of the pictures with mirrors (course, in my defense, I was taking these pictures just to show Caleb the house before we bought it, not necessarily to publish on a blog post!).  Alright, and here are just a couple pictures of what it looks like now:


Sorry, I thought I had more than two pictures...all the other ones were basically the same as these so I will have to post more when I post my master bathroom "details" later.  I had to strongly resist the urge to use the term "deets" instead of "details".  I have decided to act my age:).  Actually, I just don't want to embarrass my husband!  Clearly, it is getting too late so I will say goodnight.  Hope you enjoyed our bathroom.  Stay tuned for pictures of...hmmm...what room shall I do next???

Thursday, February 16, 2012

Stairway Pictures

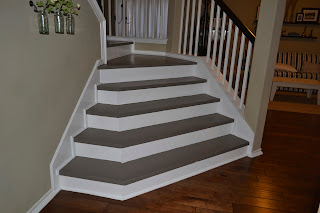
So, it has been a while...life has been crazy lately!  Who am I kidding?  Life is always a bit crazy with a toddler and a baby:).  On top of our normal craziness, my hubby just changed jobs, so we are all adjusting to his new schedule.  Anyway, the important thing is that I am back to post more before and after pictures!  These are the before and after pictures of our stairway (if you couldn't tell by the title:)). The stairs are actually one of our most current renovations in our house (most of the other improvements were done the first couple weeks after moving in).  I do not miss that nasty carpet!

Here is what it looked like before:


And here is what it looks like after:


So, what do you think?  I personally love my new stairway!  What I am struggling with however, is my photography skills...or lack there of!  We have a nice camera that I have no idea how to use.  I am sure I could have adjusted my shutter speed or some other function so my pictures wouldn't have looked so dark.  I might need to do some googling on that soon:).  I hope you enjoyed them anyway.  Have a wonderful evening friends!  

Friday, February 3, 2012

Thrifting!

I LOVE to go thrift store shopping! Anybody with me?  There is just something fun and challenging about finding that perfect ugly item that has the potential to be beautiful! So many of the things that I love in my house started out as ugly thrift store items:). Well this past weekend, I hit the thrift stores. I did have a specific piece in mind when I went shopping.  I was looking for a terrarium of sorts for a small fake plant I that got from the 99 cent store a few months back.  I know, I know, I have quite expensive taste with my 99 cent store and thrift store crazes. I did find something I thought would work for my plant (turned out to be too small), but I also came home with a few other treasures. Take a look:


What do you guys think? For all my fellow San Antonio Christian School friends out there, were you thinking "go Lions!" with that large painting? Ha! Lots of gold going on, right?! Lots of ugly going on too! But it's nothing a can of spray paint can't fix! I will be sharing what I did to each item once they are completed.

Thursday, February 2, 2012

Dining Room

Okay, so when I said I was going to get pictures posted "tomorrow" on my previous post, I really meant "next week":).  I had great intentions, but life got in the way...you guys know how that is, right?  The important thing is that I am ready to share some dining room pictures today.  As always, I will start with the before pictures....


Hmm...what can I say about that wall color?...I guess since I have nothing nice to say, I won't say anything at all!  Now here is my dining room after:


Well, I do love my dining room even though we never use it!  I guess the advantage to never using it is that it actually stays clean!!!  I know I have lots of questions to address, like where everything is from, paint color, etc., but I am going to go back through each room after all the before and afters and do the "break down" with all the details!  The entry room pictures are coming soon (I better not say tomorrow:) just in case it is another week)!